UniPutra Golf Club Course Layout
Distance marker:
__ = 100 meter
__ = 150 meter
__ = 200 meter
Orchard Nine
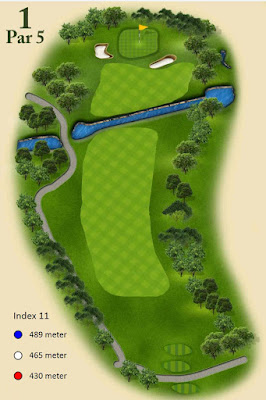
Golfers cannot see the green from tee box, after tee shot the course will be sloping down towards water hazards. Slices tee off will land on hole 9 (right side) without OB. After tee off, you can see remaining layout until green.
The water hazard is actually a drain cutting across with a pond on left and right. Two bunkers guards green on left and right. The green is sloping towards water hazard.
Golfers cannot see the green from tee box, left side after fence is OB. Fade will not OB but difficult play if sliced.
The remaining distance towards green is sloping upward with two bunkers guarding the green front and back at the right side.
From tee box, golfer can see the green. Water hazard on the left side will get wider until before the green. Fade tee shot still can recover, slice will send balls to hole 2 on the right.
There are two bunkers guarding the green on the left and right side. The green is elevated from ground hence bunker shot or chip shot need to be high and landed with minimal roll.
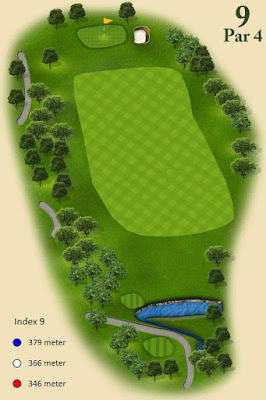
This hole is difficult with water hazard along the right side of the fairway. However, there is also water hazard on the left side from previous hole but not shown in the picture. Tee off must be straight with small room for error.
The entire fairway is flat and sloping up towards the green. The green is tricky with steep slope hence good green reading is needed to hole out.
Hole 5 is challenging with water hazard on the right side while beyond the fence of left side is OB. Tee shot needs to be either straight or draw to benefit from dogleg left. The remaining distance of fairway is flat until sloping up to the green.
There is a bunker guarding on the left side at the front of the green. The approach shot best is to land on the green with minimal roll. Any shot over the green will find difficult to chip as the green is on high ground.
This par 3 is uphill view from tee box, club selection is important as many shots usually landed short before the green. Bear in mind that over the fence on left side of fairway is OB. Two bunkers guarding the green with one at the front and one at the back.
From tee box, golfer can see the entire layout of this hole. Tee shot with driver needs to be over 200 meter otherwise second shot will be difficult to carry over the valley. Reminder for hard hitter that the distance to valley is 250 meter. OB is over the fence on the left.
The remaining distance after valley to green is uphill slope with two bunkers guarding on the left and right.
This par 3 is sloping to the right, so tee shot can either straight or towards left side which has kick back to center. If miss the green and landed either to the back or right side, high flop shot needed to get up on the green which is at the higher ground.
Fairway cannot be seen from tee box but the fairway is wide for draw & fade. Distance from 150 meter to the green is slight slope to left with a bunker guarding the green at the right side.
The approach shot best is to land on the green with minimal roll or slight short for easy chip. Any shot over the green will find difficult to chip as the green is on top.
Forest Nine
This hole is dogleg left which needs to tee off over valley & uphill fairway. Distance to carry over valley is approximately 150 meter. OB is after the fence on left. From fairway, the green still cannot been seen so second shot must aim correctly otherwise too short will land at the bunker before green.
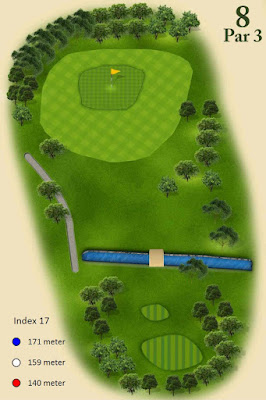
Shortest par 3 with a big pond, the fairway after pond is uphill to the green.
This hole is dog leg right with green not invisible from the tee box. First half of the fairway is sloping downwards so the best tee shot is straight or draw with carry 250 meter before water hazards.
The green is guarded by two bunkers on left and right. The green is sloping left towards the water hence good putting is important for hole out.
Tee off needs to cross small valley for this hole which should be easy. However, the rough on left is a slope so best is to hit straight will some room for draw as the slope on right will kick the ball back into fairway.
Even though the fairway is flat, the second shot still challenging because of long distance. Two bunkers guarding the green on left and right.
This is short par 4 but down the uphill. Green is not visible from tee box. Tee shot needs to be a good distance for ball to roll downhill for extra carry distance. The second shot is uphill with 3 bunkers guarding the green.
 |
|
This hole needs precise tee off as there are tress on left and right. Straight tee shot will land the ball on fairway which will be good spot for second shot. The fairway is uphill until the green. There are two bunkers guarding the green on right side.
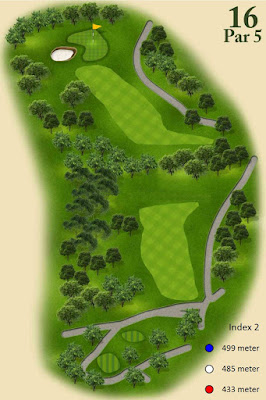
This hole needs good tee off with distance for second shot to carry over valley. Distance from blue tee to valley is approximately 280 meter. Hard hitter might consider using wood to tee off over 200 meter and let ball carry until before the valley.
The fairway after valley is uphill until the green. There is a bunker guarding the green on left
This is downhill par 3 with entire layout visible from tee box. There is a small valley to cross in order to reach the green. This green has tricky slope so read the green well before putt.
This final hole is par 5 with uphill tee shot. Decent distance is needed for tee shot in order to see the remaining layout. The mid part of fairway is downward slope and upward for remaining 150 meter. The green is well guarded by four bunkers.


